Embed the application journey
Embed the YouLend Application Journey component in your dashboard, including embedded component initialization, language behavior, CSP, and WebView setup.
The Application Journey component lets the merchant submit the full funding application within your dashboard without requiring any redirect or YouLend login.
The component automatically opens the most relevant journey step based on the state of the lead. For example, if you already provided company and owner/director details via API, the component starts directly on the 'Financial information' step as shown here:
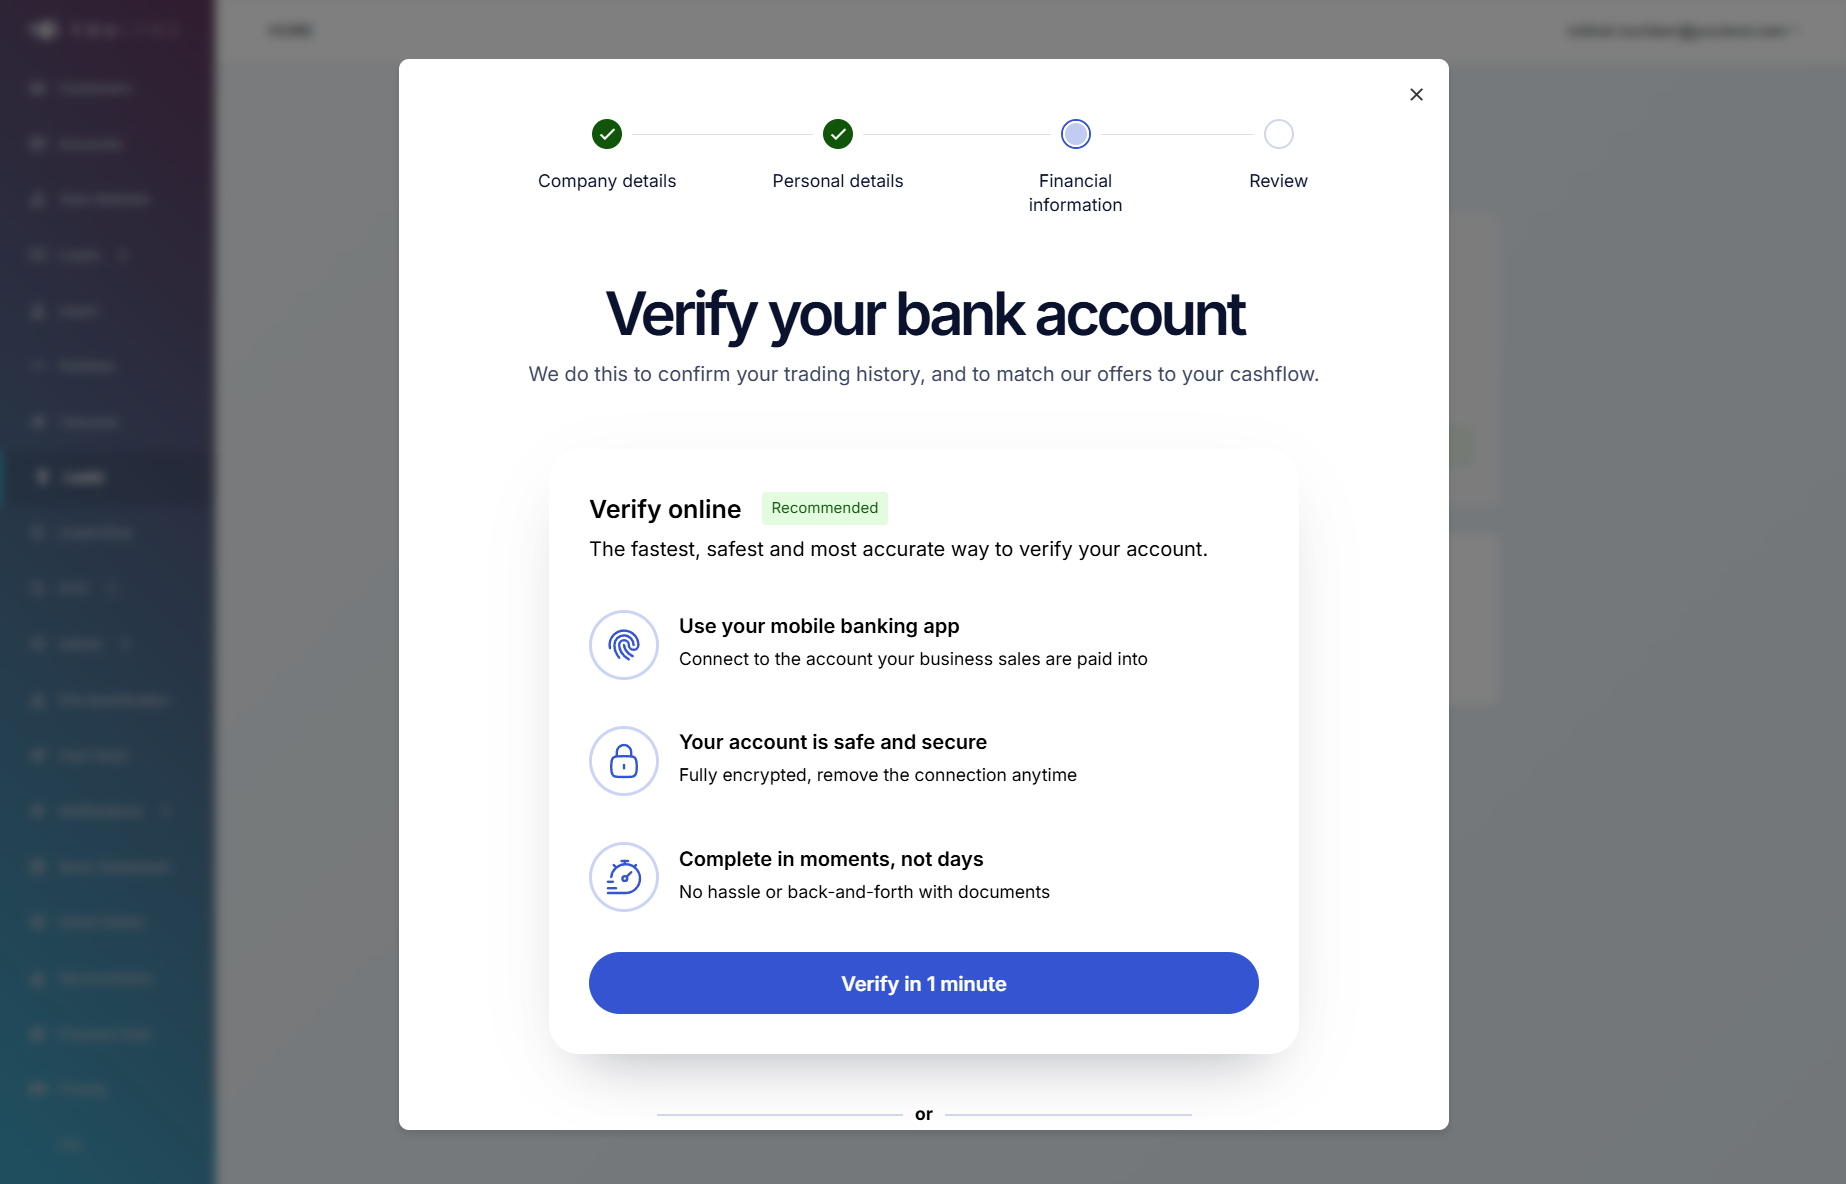
ApplicationJourney component for a customer who still needs to provide financial information before submitting their funding application.
1. Back-end: add endpoints to create leads and tokens
On your server, first make sure you've authenticated with the YouLend API (see https://docs.youlend.com/reference/authentication).
Then, create three endpoints to:
- Create a lead: See Create a lead.
- Provide significant persons data:add owners/directors info)
- Create a token: Create a short-lived token to be passed to the Embedded Component package based on your unique identifier for the relevant merchant - we call this thirdPartyCustomerId - that you also supplied when creating the lead. See create an embed token.
2. Front-end: initialize the Embedded Component Package and render the component
We recommend loading the Embedded Component Package via our NPM wrapper which asynchronously loads the script, pins the matching CDN release version, applies Subresource Integrity (SRI), and provides relevant TypeScript types. Install it by running npm i ylembed-js.
Alternatively, you can load the script directly from our CDN. For strict version pinning, use a release-specific URL such as:
https://sdk.youlend.com/releases/1.0.3/ylembed.js
The existing latest-v1 URL remains available for backwards compatibility:
https://sdk.youlend.com/v1/ylembed.js
The /v1/ylembed.js URL may change when we release updates, so use /releases/{version}/ylembed.js if you need a fixed script version.
First, initialise the Embedded Component Package by calling loadYlEmbed with a few details and a function that calls the new 'Create a token' endpoint on your server created above.
Then, call .create('ApplicationJourney') on the returned instance to create components. Do this early to warm up assets for a snappier UX.
Finally, when ready (e.g. after creating a lead), open the modal by calling .open() on the component.
import { loadYlEmbed } from 'ylembed-js';

// 1. Create embed token for the logged in merchant
const createEmbedToken = async () => {
  const res = await fetch('/ylembed-token', { method: 'POST' });
  if (!res.ok) {
    // Handle errors here
    return;
  }
  const { accessToken } = await res.json();
  return accessToken;
};

// 2. Initialise the Embedded Component Package
const ylEmbedInstance = await loadYlEmbed({
  thirdPartyCustomerId: 'YOUR_UNIQUE_ID_FOR_THIS_MERCHANT',
  country: 'GB',          // ISO 3166-1 alpha-2 country code; used to open the relevant localized journey
  partnerName: 'example', // YouLend will provide this
  createEmbedToken,       // Embedded Component Package calls this whenever it needs a token
  environment: 'sandbox', // or 'production'
});

// 3. Create component (do this early to preload assets)
const ylApplicationJourney = ylEmbedInstance.create('ApplicationJourney', {
  onApplicationSubmitted: (leadId) => console.log(leadId); // Optional - triggers once the merchant has submitted the application
});

// 4. Later, when ready (e.g. after creating a lead), open the modal:
ylApplicationJourney.open();
<script
src="https://sdk.youlend.com/releases/1.0.3/ylembed.js"
integrity="sha384-doEEdHs9ui1mXwVwm3qr3Wq3CGmmM0OwWgqf93lG7Z5mcqHN4vUSX1BaA3QdO0oq"
crossorigin="anonymous">
</script>
<script>
const createEmbedToken = async () => {
const res = await fetch('/ylembed-token', { method: 'POST' });
const { accessToken } = await res.json();
return accessToken;
};
const ylEmbedInstance = new window.YlEmbed({
thirdPartyCustomerId: 'YOUR_UNIQUE_ID_FOR_THIS_MERCHANT',
country: 'GB',
partnerName: 'example',
createEmbedToken,
environment: 'sandbox',
});
const ylApplicationJourney = ylEmbedInstance.create('ApplicationJourney', {
onApplicationSubmitted: (leadId) => console.log(leadId),
});
ylApplicationJourney.open();
</script>Script versioning and Subresource Integrity
YouLend provides release-specific CDN URLs for the Embedded Components script. These URLs are intended to be immutable, meaning the script content for a published version will not change.
Example:
https://sdk.youlend.com/releases/1.0.3/ylembed.js
Each release also includes a matching Subresource Integrity hash:
https://sdk.youlend.com/releases/1.0.3/ylembed.sri.txt
SRI allows the browser to verify that the downloaded script matches the expected SHA-384 hash before executing it. If the script content does not match the supplied hash, the browser blocks the script.
When loading the script directly, include both integrity and crossorigin="anonymous":
<script
  src="https://sdk.youlend.com/releases/1.0.3/ylembed.js"
  integrity="sha384-doEEdHs9ui1mXwVwm3qr3Wq3CGmmM0OwWgqf93lG7Z5mcqHN4vUSX1BaA3QdO0oq"
  crossorigin="anonymous">
</script>
If you use the NPM wrapper, this is handled automatically. Each NPM package version loads the matching versioned CDN script and applies the correct SRI hash.
3. Set the embedded component language
Set the country value in loadYlEmbed to open the localized version of the embedded application journey for that market.
For example:
country value | Initial embedded experience |
|---|---|
FR | French |
DE | German |
US | US English |
GB | English |
NL or BE | Dutch |
The PreferredLanguageCode field on the onboarding API is stored against the lead, but it does not set the initial language of the embedded component.
If a merchant's preferred language is different from their country, use the country value that best matches the experience you want to show. Before doing this, confirm that any country-specific behaviour for that market is suitable for your integration.
The Embedded Component Package does not currently expose a method to change the embedded component language after initialization.
4. Other setup
Please ensure your website's Content Security Policy allows the following:
- Scripts (script-src) from https://sdk.youlend.com
- If you load the script directly with SRI, ensure your integration uses
crossorigin="anonymous"on the script tag. The YouLend CDN returns CORS headers required for browser SRI checks.
- If you load the script directly with SRI, ensure your integration uses
- Iframes (frame-src):
- Production: https://youlend.com (and/or https://youlend.us if supporting USA)
- Sandbox: https://partners.staging-youlend.com (and/or https://uspartners.staging-youlend.com if supporting USA)
WebView configuration requirements for YouLend Embedded Components
JavaScript must be enabled for Android and iOS WebViews
- Android: set
javaScriptEnabled = trueon the WebView. - iOS: ensure
WKWebViewConfiguration.defaultWebpagePreferences.allowsContentJavaScript = true
JavaScript is allowed by default inWKWebView, but must not be disabled.
Site storage must remain available for Android and iOS WebViews
- Android: enable
domStorageEnabled = truesolocalStorage/sessionStoragework as in a normal browser. - iOS: use the default
WKWebViewstorage; don’t disable or aggressively clear cookies /localStorage/sessionStoragefor the YouLend Embedded Component Package.
Navigation should be kept inside the WebView
-
Android: use a
WebViewClientto handle navigation inside the WebView.
If you customiseshouldOverrideUrlLoading, ensure navigations for the YouLend Embedded Component Package URLs stay in the WebView rather than being redirected to the system browser. -
iOS: if using
WKNavigationDelegate/WKUIDelegate, allow navigations for the YouLend Embedded Component Package URLs to continue in the sameWKWebView(for example, return.allowfor those requests).
For links that open new windows (e.g.target="_blank"/window.open), load the requested URL into the existingWKWebViewinstead of creating a separate one or handing off to Safari.
Updated 6 days ago